Recover Your Surface Pro 3 with the Surface Recovery Image
A comprehensive guide to restoring your Surface Pro 3 to its original state

Introduction
If you’re experiencing issues with your Surface Pro 3, using the Surface Recovery Image can be a lifesaver. This guide will walk you through the steps to recover your device and get it back to working condition.
Prerequisites
Before you begin, make sure you have the following:
- A USB drive with at least 16GB of storage.
- Access to another computer to download the recovery image.
- Your Surface Pro 3 and its charger.
Important Note
The Surface Recovery Image for the Surface Pro 3 is based on Windows 10 build 1511. This build will not update to higher versions through Windows Update. To upgrade to the latest version of Windows 10 (22H2), you will need to use the Windows Media Creation Tool.
Steps to Recover Your Surface Pro 3
Step 1: Download the Surface Recovery Image
- Go to the Microsoft Surface Recovery Image page. [https://support.microsoft.com/en-us/surface-recovery-image]
- Select your Surface model (Surface Pro 3) and enter your serial number.
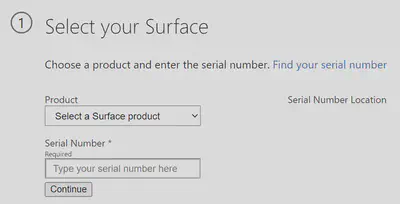
SurfaceRecoveryImage-001 - Download the recovery image to your computer.
Step 2: Prepare the USB Drive
- Insert your USB drive into the computer.
- Open Command Prompt as an administrator.
- Type
diskpartand press Enter. - In the DiskPart window, type
list diskand press Enter to see the list of disks. - Identify your USB drive from the list and type
select disk X(replaceXwith the disk number of your USB drive) and press Enter. - Type
cleanand press Enter to remove all partitions from the USB drive. - Type
create partition primaryand press Enter to create a new primary partition. - Type
format fs=fat32 label=RecoveryImage quickand press Enter to format the partition as FAT32. - Type
assignand press Enter to assign a drive letter to the USB drive. - Type
exitand press Enter to close DiskPart. - Type ‘Bootsect /nt60 X:’ (replace
Xwith the disk number of your USB drive) and press Enter.
Step 3: Create a Recovery Drive
- Open the downloaded recovery image file and extract its contents to the USB drive.
- Ensure all files are copied to the root directory of the USB drive.
Step 4: Boot from the USB Drive
- Turn off your Surface Pro 3.
- Insert the USB drive into the Surface.
- Press and hold the volume-down button, then press and release the power button.
- When the Surface logo appears, release the volume-down button.
Step 5: Recover Your Surface
- Follow the on-screen instructions to boot from the USB drive.
- Select your language and keyboard layout.
- Choose “Troubleshoot” > “Recover from a drive.”
- Follow the prompts to complete the recovery process.
Step 6: Upgrade to Windows 10 22H2
- Download the Windows Media Creation Tool.
- Run the tool and select “Create installation media for another PC.”
- Choose the ISO file option and save the ISO file to your Downloads folder.
- Once the download is complete, go to your Downloads folder, right-click the ISO file, and select “Mount.”
- Open the mounted drive and run the
setup.exefile. - Important: Disconnect any external devices (e.g., USB drives, external hard drives, printers) before starting the upgrade to avoid driver errors.
- Follow the on-screen instructions to upgrade to Windows 10 22H2.
Conclusion
Recovering your Surface Pro 3 using the Surface Recovery Image is a straightforward process that can resolve many issues. By following these steps, you can restore your device to its original state and then upgrade to the latest version of Windows 10 for the best performance and features. Remember to disconnect any external devices during the upgrade to avoid potential driver errors.
André van den Berg
Consultant, Blogger, Speaker, Meetup/Event Attendee, Owner of MyStickerBox
André is widely interested, eager to learn and a DevOps enthusiast. He has experience with various projects in the field of lift and shift of on-premise environments to Azure Cloud, migrating databases and web servers of customers at suppliers to their own Azure environments together with the supplier. In addition, he also set up standard Bicep Blueprints for rolling out Azure resources in a consistent way at multiple customers who were managed by MSP. André likes to share his knowledge and is a real team player. In addition, he can also work well independently and is pleasant to deal with.